
1、springboot和activemq的使用相对来说比较方便了,我在网上看了很多其他的资料,但是自己写出来总是有点问题所以,这里重点描述一下遇到的一些问题。
2、至于activemq的搭建和springmvc的搭建可以参考:http://www.cnblogs.com/ll409546297/p/6898155.html
3、项目的搭建和使用
1)目录结构
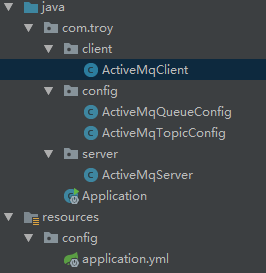
2)需要的依赖包pom.
<? version="1.0" encoding="UTF-8"?><project ns="http://maven.apache.org/POM/4.0.0" ns:xsi="http://www.w3.org/2001/ Schema-instance" xsi:schemaLocation="http://maven.apache.org/POM/4.0.0 http://maven.apache.org/xsd/maven-4.0.0.xsd"> <modelVersion>4.0.0</modelVersion> <groupId>com.troy</groupId> <artifactId>springbootactivemq</artifactId> <version>1.0-SNAPSHOT</version> <parent> <groupId>org.spring work.boot</groupId> <artifactId>spring-boot-starter-parent</artifactId> <version>1.5.7.RELEASE</version> </parent> <dependencies> <dependency> <groupId>org.spring work.boot</groupId> <artifactId>spring-boot-starter-web</artifactId> <version>1.5.7.RELEASE</version> </dependency> <dependency> <groupId>org.spring work.boot</groupId> <artifactId>spring-boot-starter-activemq</artifactId> <version>1.5.7.RELEASE</version> </dependency> </dependencies></project>
3)基本的配置application.yml
server: port: 8090spring: activemq: broker-url: tcp://192.168.5.10:61616 user: admin password: admin jms: pub-sub-domain: true说明:jms:pub-sub-domain:true(为true时是topic模式,为false是queue模式)
4)这里介绍两种发送数据的方式
(1)确定发送方式,这种需要做配置
topic模式:ActiveMqTopicConfig.class
@Configurationpublic class ActiveMqTopicConfig { @Bean public Topic topic(){ return new ActiveMQTopic("topic"); }}
queue模式:ActiveMqQueueConfig.class
@Configurationpublic class ActiveMqQueueConfig { @Bean public Queue queue(){ return new ActiveMQQueue("queue"); }}
发送:ActiveMqClient.class
@RestController@RequestMapping("/api")public class ActiveMqClient { @Autowired private JmsTemplate jmsTemplate; @Autowired private Topic topic; @Autowired private Queue queue; @RequestMapping("/send") public void send(){ jmsTemplate.convertAndSend(this.topic,"发送的topic数据!"); jmsTemplate.convertAndSend(this.queue,"发送的queue数据!"); }}
注:这里我方便测试,就直接写的调用的方式!
(2)直接发送的方式:ActiveMqClient.class
@RestController@RequestMapping("/api")public class ActiveMqClient { @Autowired private JmsTemplate jmsTemplate; @RequestMapping("/send") public void send(){ jmsTemplate.send("topic", new MessageCreator() { @Override public Message createMessage(Session session) throws JMSException { TextMessage textMessage = session.createTextMessage(); textMessage.setText("send data"); return textMessage; } }); }}
5)接收数据:ActiveMqServer.class
@Componentpublic class ActiveMqServer { @JmsListener(destination = "topic") public void receiveTopic(String message) { System.out.println("监听topic=============监听topic"); System.out.println(message); } @JmsListener(destination = "queue") public void receiveQueue(String message) { System.out.println("监听queue=============监听queue"); System.out.println(message); }}
注:也可以实现MessageListener接口来接收数据,但是需要配置的东西和springmvc差不多,这里不做介绍。
继续阅读与本文标签相同的文章
上一篇 :
利用quartz实现定时调度
下一篇 :
SQL审核工具发布
-
dubbo之基础应用
2026-05-26栏目: 教程
-
netty之粘包分包的处理
2026-05-26栏目: 教程
-
netty之管道处理流程
2026-05-26栏目: 教程
-
netty之编解码
2026-05-26栏目: 教程
-
netty之心跳机制
2026-05-26栏目: 教程