自定义标题栏在很多的android app中很常见,可以说是一种很有用的UI设计方法。自
己也本着学习的态度,经过一番各种坑,终于实现了,现总结如下:
一:大致流程
1. 对指定的android activity设置自定义主题风格,其中自定义主题风格是关键
在android 4.0以上版本中如果使用Theme.Holo或者Theme.Light等,程序会
一直报错误-you cannot combine custom with other feature s
2. 在对应的Activity中加入代码
super.onCreate(savedInstanceState); requestWindowFeature(Window.FEATURE_CUSTOM_ ); setContentView(R.layout.main); getWindow().setFeatureInt(Window.FEATURE_CUSTOM_ ,R.layout.mycustom );3. 在styles. 使用如下的自定义主题。
<resources> <style name="Window Background" > </style> <style name="MyTheme" parent="android:Theme"> <item name="android:window Size">60dp</item> <item name="android:window BackgroundStyle">@style/Window Background</item> </style></resources>
二:测试MainActivity源代码
MainActivity.java
package com.example. _bar;import android.app.Activity;import android.content.Intent;import android.os.Bundle;import android.view.View;import android.view.View. Listener;import android.view.Window;import android.widget.Button;public class MainActivity extends Activity { Button button; @Override protected void onCreate(Bundle savedInstanceState) { super.onCreate(savedInstanceState); requestWindowFeature(Window.FEATURE_CUSTOM_ ); setContentView(R.layout.activity_main); getWindow().setFeatureInt(Window.FEATURE_CUSTOM_ ,R.layout. barstyle); button=(Button) findViewById(R.id.button1); button.set Listener(new Listener(){ @Override public void (View v) { // TODO Auto-generated method stub Intent intent=new Intent(MainActivity.this,test_ _bar.class); startActivity(intent); } }); }}test_ _bar.java
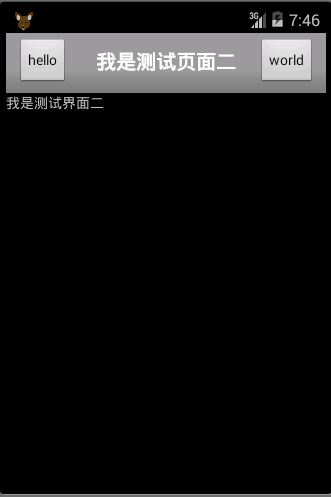
package com.example. _bar;import android.app.Activity;import android.os.Bundle;import android.view.Window;import android.widget.Button;import android.widget.TextView;public class test_ _bar extends Activity{ @Override protected void onCreate(Bundle savedInstanceState) { super.onCreate(savedInstanceState); // 去标题 //requestWindowFeature(Window.FEATURE_NO_ ); requestWindowFeature(Window.FEATURE_CUSTOM_ ); setContentView(R.layout. bartest); //设置标题为某个layout,标题样式 getWindow().setFeatureInt(Window.FEATURE_CUSTOM_ , R.layout. barstyle); //设置标题栏的标题 set ("hello","我是测试页面二","world"); } private void set (String btn1str,String string,String btn2str) { // TODO Auto-generated method stub Button btnback=(Button) findViewById(R.id.back); Button btnnext=(Button) findViewById(R.id.next); TextView tv =(TextView) findViewById(R.id. ); btnback.setText(btn1str); tv .setText(string); btnnext.setText(btn2str); }}
三: 资源文件
barstyle. 的内容
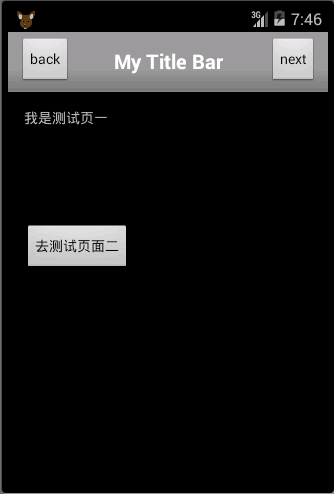
<RelativeLayout ns:android="http://schemas.android.com/apk/res/android" android:layout_width="fill_parent" android:layout_gravity="fill_horizontal" android:orientation="horizontal" android:layout_height="fill_parent" > <Button android:id="@+id/header_left_btn" android:layout_width="wrap_content" android:layout_height="wrap_content" android:layout_alignParentLeft="true" android:layout_marginLeft="5dp" android:layout_centerVertical="true" android:text="back" android:textColor="#000000"/> <TextView android:id="@+id/header_text" android:layout_width="fill_parent" android:layout_height="fill_parent" android:layout_toRightOf="@+id/header_left_btn" android:layout_toLeftOf="@+id/header_right_btn" android:text="My Bar" android:textSize="20sp" android:textStyle="bold" android:textColor="#FFFFFF" android:gravity="center" android:layout_centerHorizontal="true" android:layout_centerVertical="true" android:singleLine="true" /> <Button android:id="@+id/header_right_btn" android:layout_width="wrap_content" android:layout_height="wrap_content" android:layout_alignParentRight="true" android:layout_marginRight="5dp" android:layout_centerVertical="true" android:text="next" android:textColor="#000000"/></RelativeLayout>
activity_main.
<RelativeLayout ns:android="http://schemas.android.com/apk/res/android" ns:tools="http://schemas.android.com/tools" android:layout_width="match_parent" android:layout_height="match_parent" android:paddingBottom="@dimen/activity_vertical_margin" android:paddingLeft="@dimen/activity_horizontal_margin" android:paddingRight="@dimen/activity_horizontal_margin" android:paddingTop="@dimen/activity_vertical_margin" tools:context="com.example. _bar.MainActivity" > <TextView android:id="@+id/textView1" android:layout_width="wrap_content" android:layout_height="wrap_content" android:text="我是测试页一" /> <Button android:id="@+id/button1" android:layout_width="wrap_content" android:layout_height="wrap_content" android:layout_below="@+id/textView1" android:layout_marginTop="97dp" android:text="去测试页面二" /></RelativeLayout>
bartest.
<? version="1.0" encoding="utf-8"?><LinearLayout ns:android="http://schemas.android.com/apk/res/android" android:layout_width="match_parent" android:layout_height="match_parent" android:orientation="vertical" > <TextView android:id="@+id/textView1" android:layout_width="wrap_content" android:layout_height="wrap_content" android:text="我是测试界面二" /></LinearLayout>
最后别忘记在android的manifest配置文件中加上自定义的主题
android:theme="@style/MyTheme"
界面一:
界面二:
遗失的拂晓
继续阅读与本文标签相同的文章
上一篇 :
Android 设置 横屏 竖屏
下一篇 :
Android问题解决
-
[python skill]Python 中 NaN 和 None 的详细比较
2026-05-26栏目: 教程
-
[python skill]python中tuple 和list 的区别
2026-05-26栏目: 教程
-
[python skill]利用python实现假设性检验方法
2026-05-26栏目: 教程
-
[math skill]Permutation Test 置换检验
2026-05-26栏目: 教程
-
[python skill]利用python计算T分布下的置信区间
2026-05-26栏目: 教程