
一、soa简单介绍
1)面向服务的架构(SOA)是一个组件模型,它将应用程序的不同功能单元(称为服务)通过这些服务之间定义良好的接口和契约联系起来。SOA是解决复杂业务模块,提高扩展性,维护性,可伸缩性的最基本方案。我们的业务服务可以根据需求通过网络对松散耦合的粗粒度应用组件进行分布式部署、组合和使用。服务层是SOA的基础,可以直接被应用调用,不同的服务通过不同的团队来维护。
有效的业务分割是soa基础中的基础
2)对于大型网站常见的架构模式:
分层:便于维护,各个模块之间有一定的独立性,属于横向切分,常见的为三层架构
分割:属于纵向切分,当项目业务复杂,功能越来越多时,可以将业务功能进行拆分,常见的是拆分成项目,部署在不同的服务器上,每个模块由独立的团队进行维护
分布式:分割与分层一个主要目的就是将切分后的模块进行分布式部署,分布式意味着使用更多机器完成相同的功能,机器多意味着cpu,内存也多,处理计算的能力与并发能力也就越大
集群:集群为了使用更多的机器来处理相同的服务,用以提高性能。
3)常用的分布式方案:
分布式应用和服务:最常见的方式,即将不同的业务服务部署到不同的机器上
分布式静态资源:动静分离。将css资源或者图片独立进行分布式部署
分布式存储:最常见的是数据库分布式部署,来分割海量的数据
分布式计算:比如说hadoop等大数据处理方案
4)分布式带来的问题:
分布式意味着服务调用必须通过网络,网络带宽的问题是服务之间调用必不可免的问题
多台服务器会存在数据一致性的问题以及分布式事务问题
服务器越多宕机的概率也就越大
维护成本以及开发成本的增加
5)注意分布式一定是根据需求及业务量而定的,切不可为了分布式而分布式
6)注册中心:管理服务地址,并提供调用者访问的组件,常见的有zookeeper eureka redis等
二、soa基本架构图(以spring-cloud为例)
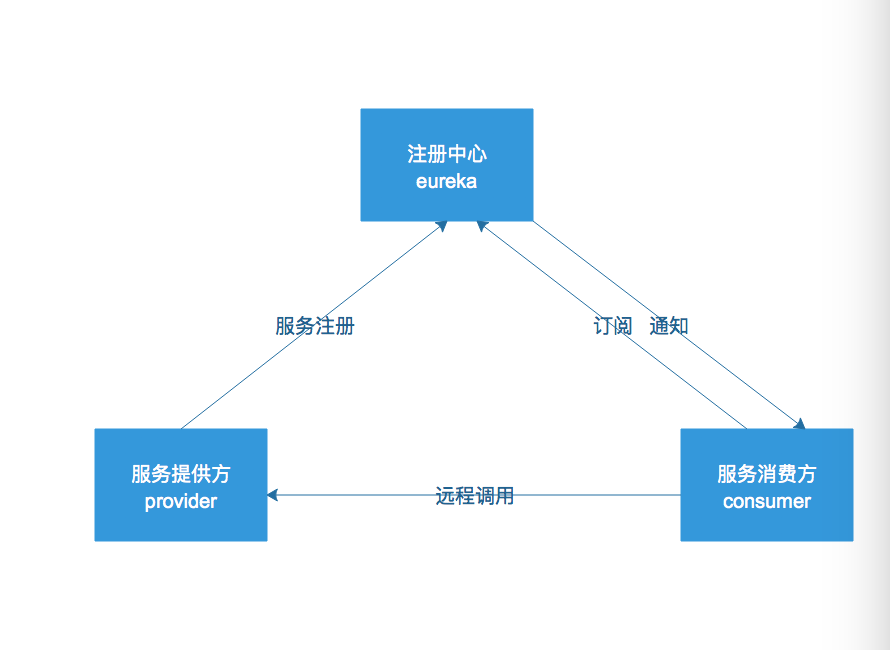
1.注册中心: 保存服务提供方暴露的服务信息,常见的注册中心有zookeeper eureka
2.服务提供方:提供服务者
3.消费方:当需要调用远程服务接口时,必须在注册中心发现服务找到服务提供者,从而进行远程方法调用
三、SpringCloud项目构建
Spring Cloud为开发人员提供了快速构建分布式系统中一些常见模式的工具(例如配置管理,服务发现,断路器,智能路由,微代理,控制总线)。使用Spring Cloud开发人员可以快速地支持实现这些模式的服务和应用程序。
1、通过访问http://start.spring.io来构建spring-cloud项目
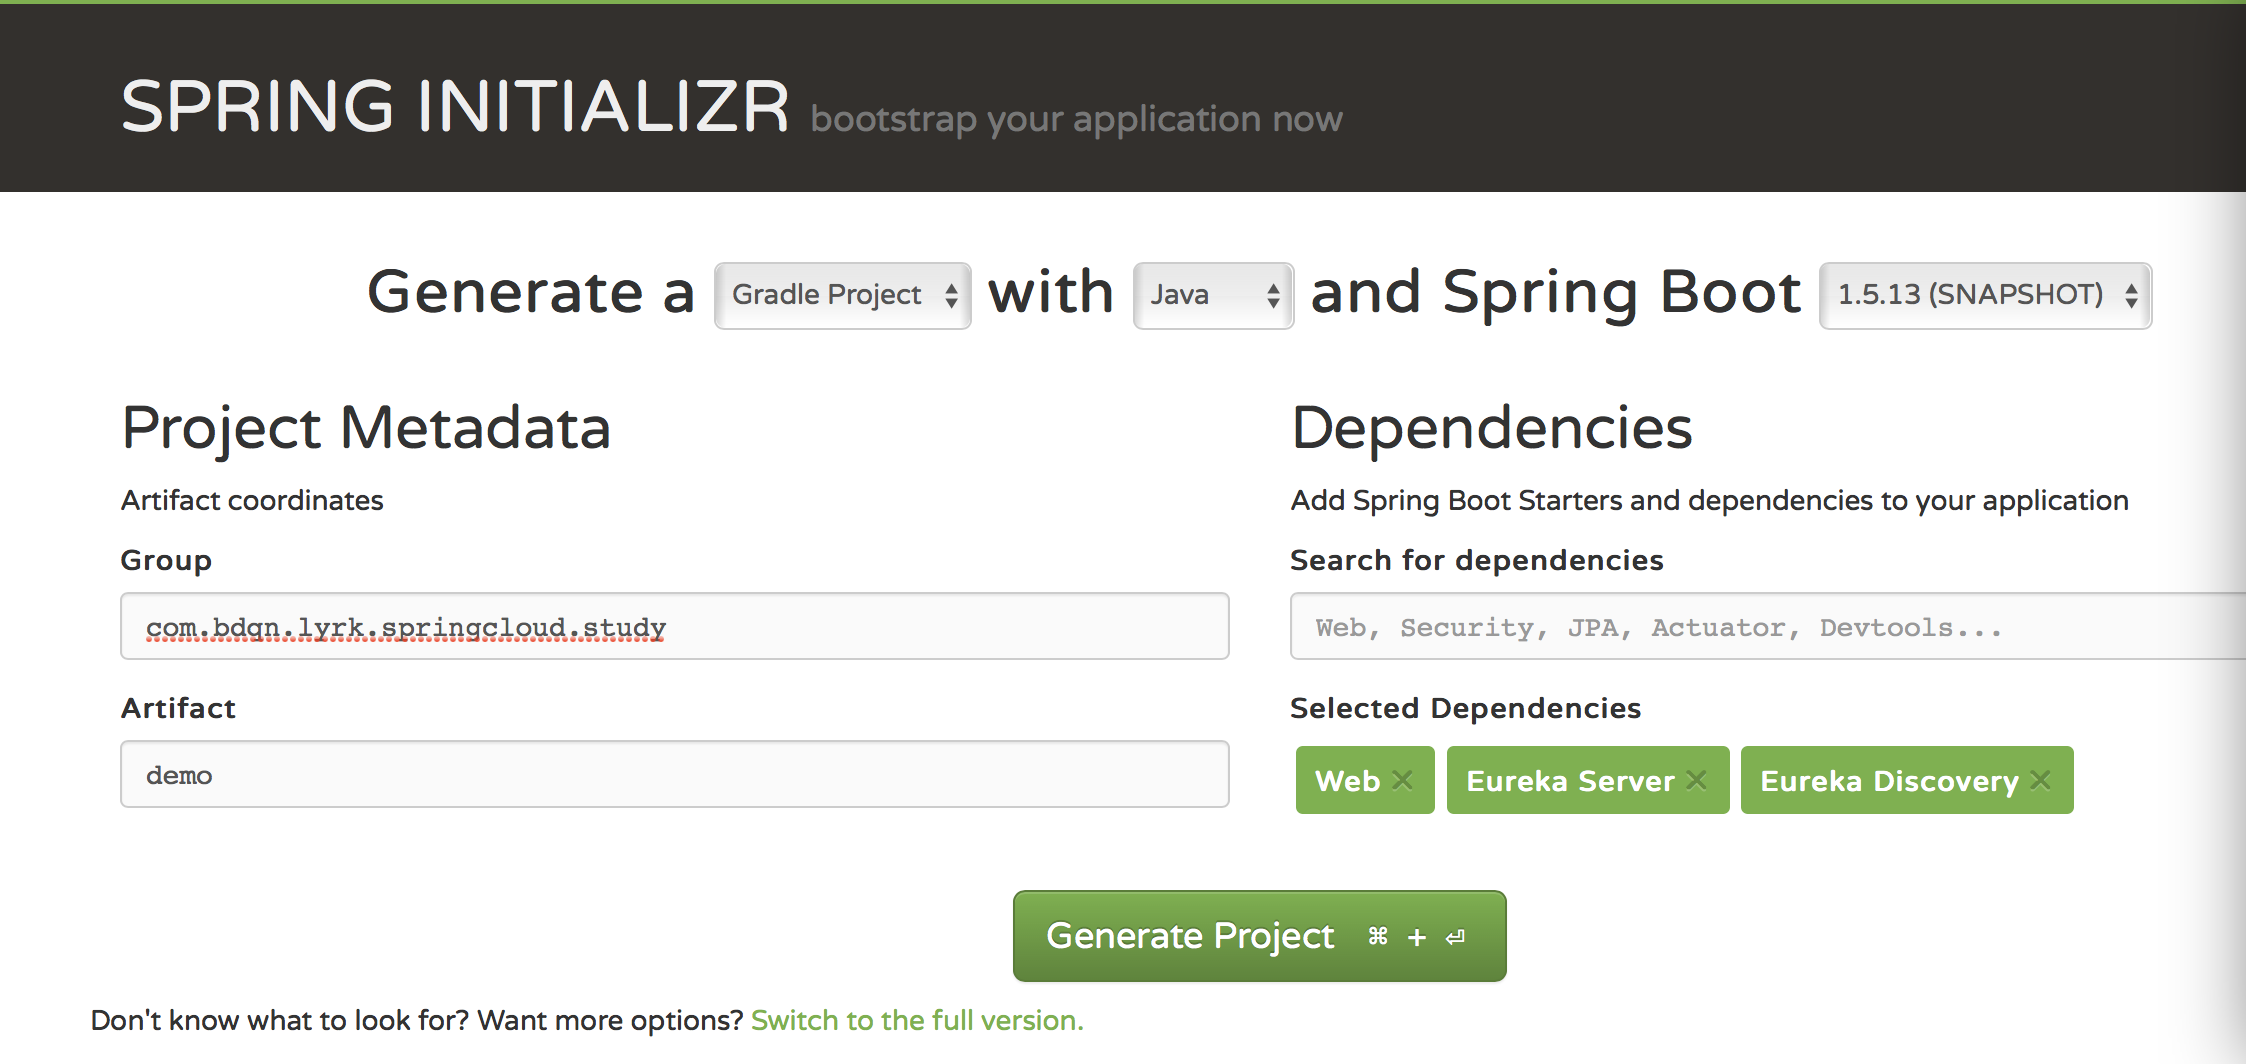
注意:在Search for dependencies里添加最基本的soa依赖项: web EurekaServer Eureka Discovery
2、通过IDEA工具导入下载好的项目并依次创建一下几个项目模块:
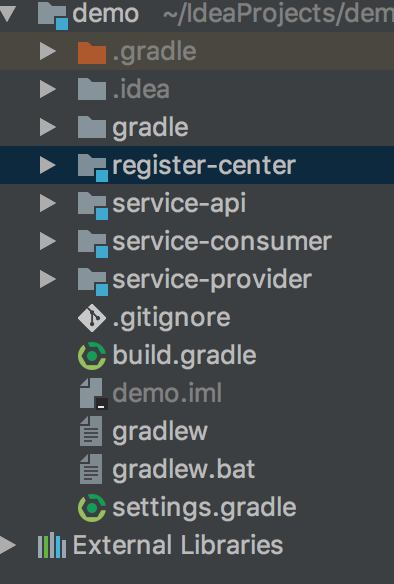
这里说明一下:
register-center:注册中心
service-api:接口契约
service-provider:服务提供方
service-consumer:服务消费方
四.实现步骤
1、实现注册中心
application.yml配置:


server: port: 8000eureka: client: register-with-eureka: false fetch-registry: false service-url: defaultZone: http://localhost:8000/eureka/
注意:在默认设置下,Eureka服务注册中心也会将自己作为客户端来尝试注册它自己,所以我们需要禁用它的客户端注册行为。
register-with-eureka: 代表是否向eureka服务注册
fetch-registry: 是否从eureka注册中心拉取信息
service-url: eureka的服务地址
编写程序入口类,通过@EnableEurekaServer 激活Eureka服务器相关配置:
package com.bdqn.springcloud.study.provider;import org.spring work.boot.SpringApplication;import org.spring work.boot.autoconfigure.SpringBootApplication;import org.spring work.cloud.netflix.eureka.server.EnableEurekaServer;@EnableEurekaServer@SpringBootApplicationpublic class RegisterCenterProvider { public static void main(String[] args) { SpringApplication.run(RegisterCenterProvider.class, args); }}
2 实现service-api
定义暴露服务的接口契约
package com.bdqn.springcloud.study.api;import com.bdqn.springcloud.study.dto.UserDTO;/** * UserService测试接口 * * @author chen.nie * @date 2017/11/13 */public interface UserService { UserDTO findUser();}
定义DTO
package com.bdqn.springcloud.study.dto;public class UserDTO { private Integer id; private String name; public Integer getId() { return id; } public void setId(Integer id) { this.id = id; } public String getName() { return name; } public void setName(String name) { this.name = name; }}
3 实现服务提供方:
gradle配置:先依赖service-api
dependencies{ compile project(":service-api")}
application-yml的配置:
server: port: 8001spring: application: name: "service-provider-demo"eureka: instance: prefer-ip-address: true client: service-url: defaultZone: http://localhost:8000/eureka/
注意:这里面要配置应用名称 注册中心的服务地址
接口实现类:
package com.bdqn.springcloud.study.provider.impl;import com.bdqn.springcloud.study.api.UserService;import com.bdqn.springcloud.study.dto.UserDTO;import org.spring work.stereotype.Service;@Service("userService")public class UserServiceImpl implements UserService { @Override public UserDTO findUser() { UserDTO userDTO = new UserDTO(); userDTO.setName("张三丰"); userDTO.setId(10); return userDTO; }}
Controller:
package com.bdqn.springcloud.study.provider.controller;import com.bdqn.springcloud.study.api.UserService;import com.bdqn.springcloud.study.dto.UserDTO;import org.spring work.web.bind.annotation.GetMapping;import org.spring work.web.bind.annotation.RestController;import javax.annotation.Resource;@RestControllerpublic class UserController { @Resource private UserService userService; @GetMapping("/user") public UserDTO getUser() { return this.userService.findUser(); }}
启动类:
package com.bdqn.springcloud.study.provider;import org.spring work.boot.SpringApplication;import org.spring work.boot.autoconfigure.SpringBootApplication;import org.spring work.cloud.client.discovery.EnableDiscoveryClient;@EnableDiscoveryClient@SpringBootApplicationpublic class ServiceProvider { public static void main(String[] args) { SpringApplication.run(ServiceProvider.class, args); }}
@EnableDiscoveryClient:用于启用发现客户端实现的注释

打来浏览器访问:http://localhost:8000
我们看到刚才的接口服务已经成功注册至Eureka中心
4.实现服务消费方
gradle配置:先依赖service-api
dependencies{ compile project(":service-api") compile 'org.spring work.cloud:spring-cloud-starter-eureka'}application.yml配置:
server: port: 8002spring: application: name: "service-consumer-demo"eureka: instance: prefer-ip-address: true client: service-url: defaultZone: http://localhost:8000/eureka/
编写Controller:
package com.bdqn.springcloud.study.consumer.controller;import com.bdqn.springcloud.study.dto.UserDTO;import org.spring work.beans.factory.annotation.Autowired;import org.spring work.cloud.client.loadbalancer.LoadBalancerClient;import org.spring work.http.ResponseEntity;import org.spring work.web.bind.annotation.GetMapping;import org.spring work.web.bind.annotation.RestController;import org.spring work.web.client.RestTemplate;@RestControllerpublic class ConsumerController { @Autowired private RestTemplate restTemplate; @Autowired private LoadBalancerClient loadBalancerClient; @GetMapping("/getUser") public String getUser() { ResponseEntity<UserDTO> responseEntity = restTemplate.getForEntity("http://SERVICE-PROVIDER-DEMO/user", UserDTO.class); UserDTO userDTO = responseEntity.getBody(); return userDTO.getName(); }}
注意我们通过http://service-provider-demo/user/ 指定service-provider的application name,让系统从注册中心去发现服务。
5.编写启动项:
package com.bdqn.springcloud.study.consumer;import org.spring work.boot.SpringApplication;import org.spring work.boot.autoconfigure.SpringBootApplication;import org.spring work.cloud.client.discovery.EnableDiscoveryClient;import org.spring work.cloud.client.loadbalancer.LoadBalanced;import org.spring work.cloud.netflix.eureka.EnableEurekaClient;import org.spring work.context.annotation.Bean;import org.spring work.web.client.RestTemplate;@SpringBootApplication@EnableDiscoveryClientpublic class ServiceConsumer { @Bean @LoadBalanced RestTemplate restTemplate() { return new RestTemplate(); } public static void main(String[] args) { SpringApplication.run(ServiceConsumer.class, args); }}
在启动项里,我们配置了一个RestTemplate 主意 @LoadBalanced注解修饰的restTemplate,具备负载均衡能力的restTemplate,即每次都会用负载均衡算法,从可用服务列表中,挑一个进行调用。
启动完毕时,我们发现注册中心中多了一个服务:

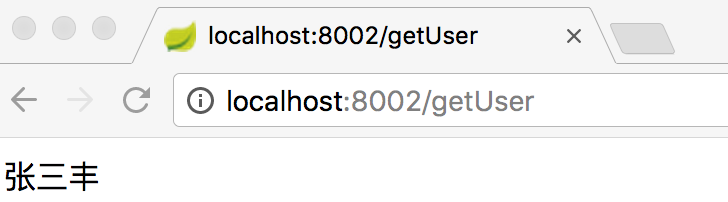
当我们访问http://localhost:8002/getUser得到如下显示就说明我们的服务运行成功了:
当停止register-center时,我们发现该访问地址依然能够拿到结果,说明消费端本地是有缓存的
继续阅读与本文标签相同的文章
SpringBoot学习之基础篇
SpringCloud学习之快速搭建分布式配置
-
SpringCloud学习之快速搭建分布式配置
2026-06-02栏目: 教程
-
SpringCloud学习之soa基础
2026-06-02栏目: 教程
-
SpringBoot学习之基础篇
2026-06-02栏目: 教程
-
solr6.6初探之主从同步
2026-06-02栏目: 教程
-
solr6.6初探之solrj
2026-06-02栏目: 教程