
一. 关于spring-cloud中的分布式配置
Spring Cloud Config为分布式系统中的外部配置提供服务器和客户端支持。使用Config Server,您可以在所有环境中管理应用程序的外部属性 ,通常情况下我们可以把需要管理的配置文件放置在svn或者git上进行做统一的配置仓库。
二 创建git远程仓库远程仓库中创建所需的配置文件
本例子中是demo-local.yml , 配置文件内容如下:


student: name: test age: 28
三 创建config-server端
1) 创建gradle模块config-server并添加gradle依赖
dependencies { compile('org.spring work.cloud:spring-cloud-config-server')}
2)编辑application.yml配置
server: port: 8000spring: cloud: config: server: git: uri: git@gitlab.com:xxxx/config.git enabled: true profiles: active: local
其中spring.cloud.config.server.git是配置远程仓库的地址,如果不使用SSH协议请配置username和password属性
3)编写启动类
package com.bdqn.lyrk.config;import org.spring work.boot.SpringApplication;import org.spring work.boot.autoconfigure.SpringBootApplication;import org.spring work.cloud.config.server.EnableConfigServer;@SpringBootApplication@EnableConfigServerpublic class ConfigServer { public static void main(String[] args) { SpringApplication.run(ConfigServer.class, args); }}
注意在启动类上添加@EnableConfigServer注解
四 创建config-client端
1)创建gradle模块demo-server并添加gradle依赖
dependencies{ compile('org.spring work.cloud:spring-cloud-starter-config')}
添加bootstrap.yml (Bootstrap.yml(bootstrap.properties)在application.yml(application.properties)之前加载)
server: port: 8001spring: cloud: config: uri: http://localhost:8000 profile: local application: name: demo
注意几点:
配置服务从 /{name}/{profile}/{label} 提供属性源,客户端应用程序中的默认绑定
“name”= ${spring.application.name}
“profile”= ${spring.profiles.active} (实际上是 Environment.getActiveProfiles() )
“label”=“master”
这里面的spring.application.name与远程仓库的配置文件名demo-local对应
编写DemoConfig类
1 package com.bdqn.lyrk.server.demo.config; 2 3 import org.spring work.boot.context.properties.ConfigurationProperties; 4 import org.spring work.context.annotation.Configuration; 5 6 @Configuration 7 @ConfigurationProperties(prefix = "student") 8 public class DemoConfig { 9 private String name;10 private int age;11 12 public String getName() {13 return name;14 }15 16 public void setName(String name) {17 this.name = name;18 }19 20 public int getAge() {21 return age;22 }23 24 public void setAge(int age) {25 this.age = age;26 }27 }
注意 @ConfigurationProperties(prefix = "student")注解,该注解作用是:获取yml配置文件的前缀student,配置文件中余下部分用javabean的属性替换即可
编写启动类:
1 package com.bdqn.lyrk.server.demo; 2 3 import com.bdqn.lyrk.server.demo.config.DemoConfig; 4 import org.spring work.boot.SpringApplication; 5 import org.spring work.boot.autoconfigure.SpringBootApplication; 6 import org.spring work.cloud.client.circuitbreaker.EnableCircuitBreaker; 7 import org.spring work.cloud.config.client.ConfigServicePropertySourceLocator; 8 import org.spring work.context.ApplicationContext; 9 10 @SpringBootApplication11 public class DemoProvider {12 13 public static void main(String[] args) {14 ApplicationContext applicationContext = SpringApplication.run(DemoProvider.class, args);15 DemoConfig demoConfig = applicationContext.getBean(DemoConfig.class);16 System.out.println(demoConfig.getName());17 }18 }
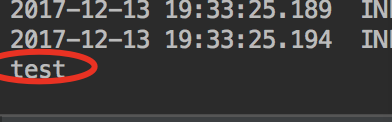
运行后得到上述结果,此时我们已经从远程配置中获取到所需的信息了
继续阅读与本文标签相同的文章
SpringCloud学习之soa基础
已经是最后一篇
-
SpringCloud学习之快速搭建分布式配置
2026-06-02栏目: 教程
-
SpringCloud学习之soa基础
2026-06-02栏目: 教程
-
SpringBoot学习之基础篇
2026-06-02栏目: 教程
-
solr6.6初探之主从同步
2026-06-02栏目: 教程
-
solr6.6初探之solrj
2026-06-02栏目: 教程